Friday, July 15, 2016

Install CentOS 6.x using Net-Install method

Purpose: The purpose of this document is to outline the basic step to installing CentOS 6.x using the Net-Install method. It is not meant to be comprehensive but rather enough information to complete the basic tasks, some previous Linux knowledge is recommended.

Step 1.) Downloaded Centos netinstall file and burned to CD and verified.

Step 2.) Rebooted blank system with newly created CD in it answered a few basic questions and told it to use DHCP and it began the install.

Step 3.) Pointed to URL (note 32 or 64 bit system):
Http://mirror.centos.org/centos/6/os/i386

Step 4.) Acquire OS updates for the system (from a system command prompt once install complete):
yum update

Note (additional commands):
To update a specific package:
yum update packagename (e.g. yum update httpd)

List updates with:
yum list updates

Listing whats installed:
yum list installed or yum list installed httpd, ect. Or
rpm -qa | less (works better)

To remove a package:
yum remove httpd

Step 5.) To install an X-windows (I preferred KDE to GNOME):
yum groupinstall "X Window System"
yum groupinstall “KDE Desktop”

If you prefer GNOME then:
yum groupinstall "GNOME Desktop Environment"

Note: Only install a single desktop environment (either KDE or GNOME) otherwise additional re-configurations will be required.

Step 6.) To make changes to your network configurations (edit file):
/etc/sysconfig/network-scripts/ifcfg-eth0

Other network related file (where hostname and gateway can be defined):
/etc/sysconfig/network

with syntax:
NETWORKING=yes
HOSTNAME=your.hostname.com
GATEWAY=xxx.xxx.xxx.xxx


                                                                                                                                                                                                                                                                                           Slack Consulting 06.2012

Thursday, July 14, 2016

Activate SNMP on VMWare ESXi host

Purpose: This document will outline the steps required to turn on SNMP within a VMWare ESXi host when it is being managed from an Vcenter Server system. This will allow an ESXi hosts to respond to SNMP queries from an SNMP management system.

Source and target system versions (may also work with other ESXi versions):
vCenter Server v5.5
ESXi v5.x

Step 1.) Open command prompt on vCenter Server system and change to the following directory:
C:\Program Files (x86)\VMware\VMware vSphere CLI or equivalent path to the VMware vSphere CLI directory (depends where program was installed).

Step 2.) Setup community string using following syntax format:
vicfg-snmp.pl --server hostname --username username --password password -c com1

e.g.- vicfg-snmp.pl --server server123 --username ChooseMe --password ChangeMe -c YourUniqueString

Step 3.) Set up for polling using following syntax format:
vicfg-snmp.pl --server hostname --username username --password password -p port

e.g.- vicfg-snmp.pl --server server123 --username ChooseMe --password ChangeMe -p 161

Step 4.) Enable SNMP on the host using following syntax format:
vicfg-snmp.pl --server hostname --username username --password password --enable

e.g.- vicfg-snmp.pl --server server123 --username ChooseMe --password ChangeMe –enable


                                                                                                                                                                                                                                                                                           Slack Consulting 05.2014

Tuesday, July 12, 2016

VMWare ESXi Host Backup/Restore Syntax

Purpose: The purpose of this document is to outline the current process and format for backing up the ESXi firmware configuration, should the need arise to restore the server to its previous state due to unforeseen circumstances.
Please note that this is different then a vm server instance backup, it is for the main ESXi host only and is for example purposes only – customize the syntax to fit your environment and standards.

Version ESXi 5.x

Step 1.)
Choose a location and folder to house the backup (e.g C:\Backups\)

Step 2.)
Using the general syntax below to craft the actual backup command syntax (also see Example section)
vicfg-cfgbackup.pl --server <name or IP> --username root --password <Password> -s "<Destination Location_Date.txt>"

Step 2a.)
Using the general syntax below to craft the load (restore) command syntax (also see Example section)
vicfg-cfgbackup.pl --server <name or IP> --username root --password <Password> -l "<Destination Location_Date.txt>"


Example(s):
Backup
vicfg-cfgbackup.pl --server 192.xx.xx.xxx --username root --password ChangeMe -s "C:\Backups\ServerName_02_25_15.txt"

Restore
vicfg-cfgbackup.pl --server 192.xx.xx.xxx --username root --password ChangeMe -l "C:\Backups\ServerName_02_25_15.txt"


                                                                                                                                                                                                                                                                                        Slack Consulting 02/2015

Case Study: Proactive QoS Monitoring (use)

The following case study was taken from a client in the Telecommunications vertical market with an organization that supplied back-haul network and last mile network connectivity to other businesses. The challenge facing the business was other companies and competitors turning up unlicensed microwave radio equipment that interfered with their licensed microwave radio equipment operating on specific frequencies and geographical zones, that served their client base. When undetected these disturbances cause quality of service issues (QoS) of unknown origin's that (negatively) affect the end customer perception of the service they are receiving (paying for). This perception can lead to loss of revenue (through client loss) and was imperative to increase visibility into the occurrences.

The challenge was to come up with a predictive monitoring solution that could detect when any type of interference, sustained or intermittent, would occur and not only notify Support, via alarms, but also to provide historical analytics data to track such occurrences for event begin, thresholding, duration and event end.

A discovery and gap analysis was done with the Owner and CTO of the organization to determine the issue/affect, business case, architectural layout of the network and prospective goals. The analysis also drilled into each equipment manufacturer to make determinations on the capabilities of each model of equipment involved. Finally a project plan was designed and agreed upon with a course of action (milestones) to achieve the project goals.


The case example, taken from the solution provided at project conclusion, below depict a Voice (VoIP) customer that was affected by a competitor bringing up an unlicensed radio device within the same frequency range and geographical zone as the customers installed licensed equipment. The predictive monitoring was able to detect voice quality degradation at the instant the competitor brought the radio up. A parallel alarm monitor was also triggered to notify Support personnel of the degradation and to begin their investigation. Figure 1, 1a below also shows additional analytic data that show that the end customer was not only experiencing degradation but also specific directional packet loss from the source monitoring probe to the end customer site. By employing this data and being able to triangulate data from other (secondary) diagnostic tools, not depicted here, the company's Support personnel were able to identify the source of the disturbance and to notify the competitor of the interference. By properly managing their environment, by engaging in this project, the company was able to identify and resolve an issue, at the onset, as opposed to dealing with an on-going issue which would have resulted in the painstaking use of a Spectrum Analyzer for interference isolation, not to mention the current and future loss of revenue due to potential client loss and reputation damage. 

                                                                            figure 1.


                                                                            figure 1a.


                                                                                                                                                                                                                                                                                            Slack Consulting 07.2011

Friday, July 8, 2016

Inexpensive physical tracking technology review (TrackR)

Purpose: The purpose of this document is for information sharing and is not an endorsement of the TrackR technology product (as we are vendor agnostic); however, it was thought that some would find this information useful prior to trying the TrackR Bravo device (especially the Caveats section). This work was completed in support of a client that was interested in a inexpensive way to track items without a monthly fee.

Testing duration: March 2016 – May 2016
Device used for test: Android

Results:
Set up is very easy, less then 15 minutes (downloaded and installed the App from Google Play, installed and updated, as updates were made available. Pairing and configuration using their App was very simple. Their Support was very responsive (not immediate but attentive and helped work through issues), would give them an A rating. Although we came at them with a professional attitude and wanted to see their product succeed. Using our android device we saw map locations being updated as TrackR device was moved around town. We did not; however, see the crowd sourcing updates work. Per Support, crowd source updates occur every 30 minutes. Crowd sourcing is when another mobile device (running the TrackR software) detects your TrackR device and provides the location where the TrackR device was seen (along with time stamp). These updates will show up on your mobile device (when you access your App) to show you where your TrackR device was last seen and when.

Minor Support issues noted:
- Car electronics interference. Corrected (although for our testing we placed the 
  TrackR device, securely, on the underside of the vehicle).
- TrackR would pair with phone but issues with App. Corrected.
- TrackR map time would update to current time with last know location (even if 
  location data was several hours/day's old). Corrected.


Caveats:
- Android, IPad, IPhone device required (at the time of this writing).
- If you have a known weak battery on your device it would be wise to replace it.
- Location setting must be left on.
- Data or WiFi must be left on (WiFi had predefined “safe zones” that could be 
  defined- for say home WiFi connections).
- Bluetooth must be left on.
- Others must also have the same set up in order for crowd sourcing to work. 
  (e.g. Bluetooth to sense the TrackR device, location so the App knows the 
  current location of your phone and the detected TrackR device, WiFi or Data 
  connection to send the location updates.)
- Order directly from the TrackR website (https://buy.thetrackr.co/) to ensure you 
   get full support as well as the ability to return the device (if required).


                                                                                                                                                                                                                                                                                            Slack Consulting 07.2016

Best Practices when making decisions about a San purchase

The following case study is in regards to Best Practices when making decisions about a San purchase.

Aside from the correct sizing of a San that fit the needs of the organization there are also choices about maintenance, spares and proactive monitoring.

Should we purchase spares and how many? Your San vendor can make a recommendation but it is highly recommended that spares be part of your strategy. Spares play an integral role, as you'll see in the example below, in an overall strategy that hopefully will make a failure seem like just an inconvenience to fix rather then an outage.

Should we purchase maintenance? Yes, and the repair turn around time and what is covered is up to you and what makes sense for your organization. Also being able to get your firmware or software updates as they are available are important as well as maintenance coverage (should something stop functioning on down the line). In the example below- the standard maintenance package included a 4 hour turn around for parts and labor (meaning the replacement will be in your hands in 4 hours and their tech or yours can install).

Investing in proactive monitoring is also important in order to get status updates on your San when things are no longer operating within specifications. For single event incidents this allows your organization to be as proactive as possible before something catastrophic occurs or grows (unnoticed into a larger issue).

In this example, the proactive alarms that came in were for a general Raid error (fairly innocuous) following by a drive failure then a reduction of spare drives.


The alarm in figure 1 told us something had occurred on the Raid controller:
                         Figure 1.

The alarm shown in figure 2 told us that we had a problem with one of our drives:
                               Figure 2.

The alarm shown in figure 3 told us two things: One that a spare drive was now in use and two if the spare is in use then the drive failure is confirmed and we need to take action to replace the drive that was noted in the alarm from Figure 2.
                                Figure 3.

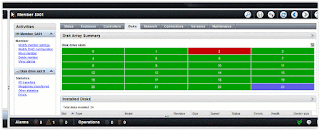
Manual validation (from the San control Gui, shown below) confirmed what the monitoring alarms revealed.
                                 Figure 4.

                                 Figure 5.