Objective:
The objective of this guide is to provide an overview of the steps
used to get an OpenBCI UltraCortex with embedded Cyton board properly
integrated with the Openvibe P300 Speller software. It is not meant
to be a comprehensive guide but just enough to get anyone (just
getting started)
pointed in the right direction. Time permitting, in the future, a
more detailed guide may replace this one or be added.
Step1.)
Download and install P300 speller application by Openvibe.
Note:
Where ever the program installs permissions will need to be adjusted
to allow add, update deletion of log files.
Step
2.)
Attain the proper electrode position layout & relocate electrodes
and re-wire to Cyton board.
10_20_System:
Figure
1.
Note:
The numbers in red 1-8 in figure above.
Step
3.)
Plug the Cyton Dongle into a USB port.
Step
4.)
Power on the Cyton board.
Step
5.) Launch
the Openvibe Acquisition Server program and configure a proper driver
and confirm connection.
Note:
Driver Properties set to Automatic, change channel names per figure 1
above (1-8), 1 being C3.
AcqServConnect:
Figure
2.
AcqSrvPlay:
Figure 3.
ChannelNamesAdj:
Figure 4.
Note: Found under the "Driver Properties" button.
Step
6.)
Launch the Openvibe Designer program & launch the
signal-monitoring utility. This is used to confirm brain signal's are
actively being received from each electrode (we left this running to
ensure we could confirm brain signals at any time).
Note:
During our initial experiment we used:
<InstallLocation>\share\openvibe\scenarios\bci-examples\p300-speller-xDAWN\p300-xdawn-0-signal-monitoring.xml.
SigMonLaunch:
Figure 5.
SigMonPlay:
Figure 6.
SigMonChannels:
Figure 7.
Step
6a.) Adjust
to only the channels defined from the Note in Step 5, figure 4.
SigMonAdj:
Figure 8.
SelectChannels:
Figure 9.
Highlight_onlyChannelsWanted:
Figure 10.
Step
6b.) Observe
the signal channel's now being monitored.
SignalMonitoring:
Figure
11.
Step
7.)
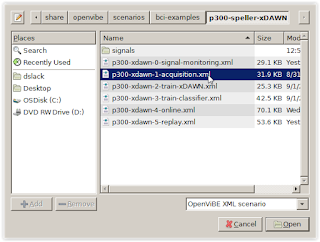
Launch the Acquisition program (p300-xdawn-1-acquisition.xml).
Once we had a good training file (where the results where above 85%)
we proceeded.
Note:
At the conclusion of each exercise a log file was written to the
following location:
<InstallLocation>\share\openvibe\scenarios\bci-examples\p300-speller-xDAWN\signals\
Acquisition_XML:
Figure
12.
Step
8.)
Launch the Training program (p300-xdawn-2-train-xDAWN.xml)
and point the program to use the best percentage result Acquisition
results file possible. We then used the fast forward selection to
quick process the file results, be patient & watch the lower console window.
Note:
This is where a detected error prompted the alternation of user
file/folder permissions.
Train_XML:
Figure
13.
AccuTargFile:
Figure 14.
Note: to select and change double click “Generic stream reader” on XML panel page, shown above.
Step
9.)
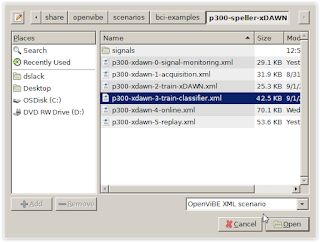
Launch the Classifier program (p300-xdawn-3-train-classifier.xml)
and point the program to use the best percentage result Acquisition
results file possible (using the same method as in the previous step). We then used the fast forward selection to
quick process the file results- which will show the percentage
results, be patient & watch the lower console window.
Note:
This is where a detected error prompted the alternation of user
file/folder permissions.
Classifier_XML:
Figure
15.
Step
10.)
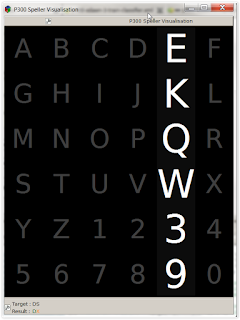
Launch the Online program (p300-xdawn-4-online.xml)
to begin using the P300 speller program to actually begin spelling
letters using a test subject's brain. The program will show a source letter at a
time (in blue), go through it's gyrations then show the resulting
letter your brain should have focused on (in green).
Note:
the source and resulting letters are depicted at the bottom left of
the screen.
Online_XML:
Figure
16.
AcqSrv02:


No comments:
Post a Comment